Stencil Buffers
One of the lesser known buffer types, but useful for a lot of different effects. In this showcase we'll be using it to mimic the "Lens of Truth" effect seen in the Legend of Zelda Ocarina of Time and Majora's Mask. Let's jump into it!
The effect
For those of you who don't know, the Legend of Zelda series has a reoccurring item in it called the Lens of Truth that allows you see objects that are invisible using an overlay on the screen.
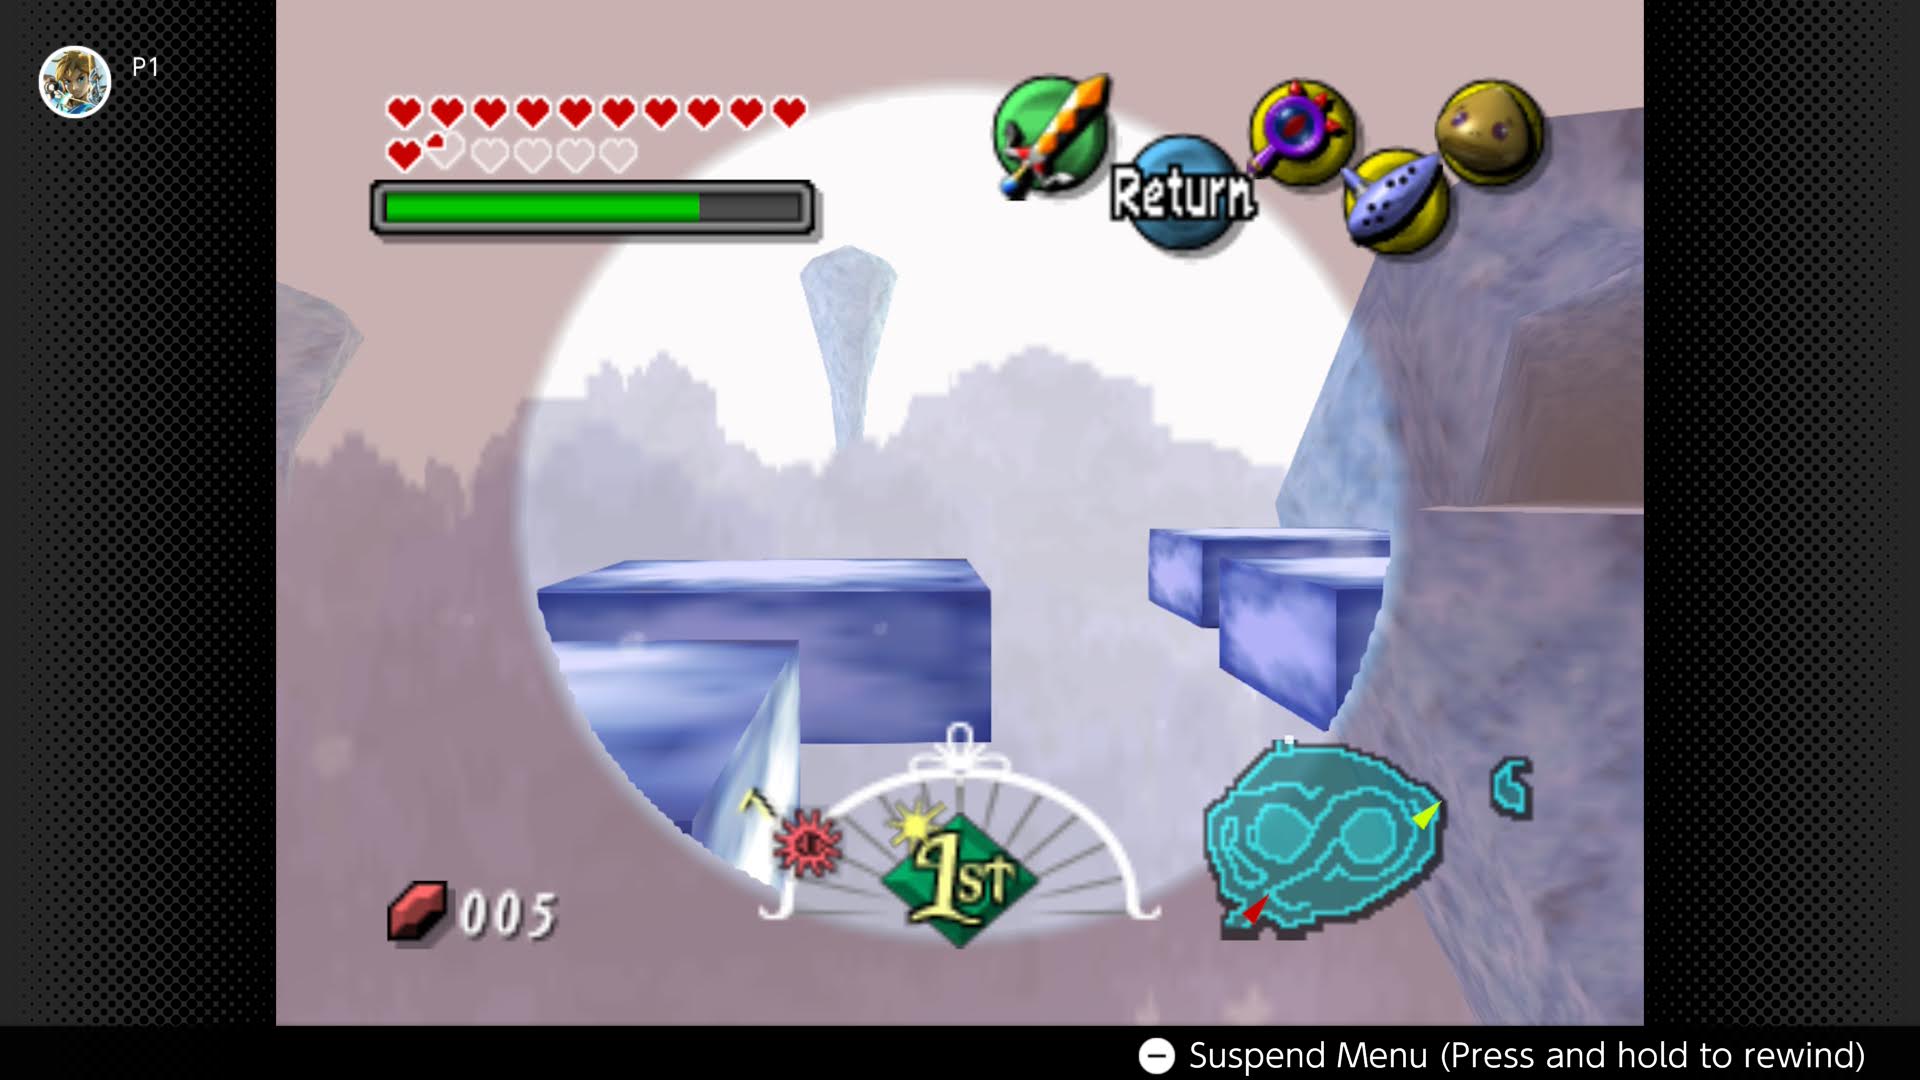
Basically it's a transparent circle that's overlayed on top of the scene and objects that are normally invisible show up in the circle. Not only objects that are only partially in the cirle get cut so that the hidden objects stay in the circle.
What are stencil buffers and how do they help?
If you've done any arts and crafts you've likely used a stencil to paint a tricky shape onto a surface. Stencil buffers allow us to define a shape to use to mask out parts of the scene to draw. Internally a stencil buffer is an unsigned integer texture that you can read and/or write values to when you render objects.
Here's how we are going to use a stencil buffer to achieve the Lens of Truth effect:
- We'll render a texture to the stencil buffer to use later
- We'll render the visible objects as normal
- We'll use the stencil buffer to mask out parts of the hidden objects.
- Finally we'll render the texture we used as a mask over top of the scene to complete the effect.
Drawing the stencil
First let's take a look at creating a stencil texture.
let depth_stencil_format = wgpu::TextureFormat::Depth24PlusStencil8;
let depth_stencil = display.device.create_texture(&wgpu::TextureDescriptor {
    label: Some("depth_stencil"),
    size: wgpu::Extent3d {
        width: display.width(),
        height: display.height(),
        depth_or_array_layers: 1,
    },
    mip_level_count: 1,
    sample_count: 1,
    dimension: wgpu::TextureDimension::D2,
    format: depth_stencil_format,
    usage: wgpu::TextureUsages::RENDER_ATTACHMENT,
    view_formats: &[],
});
let depth_stencil_view = depth_stencil.create_view(&Default::default());
You may have noticed that the texture format for the stencil buffer is wgpu::TextureFormat::Depth24PlusStencil8. This combines a 24-bit depth texture and an 8-bit stencil texture. That means we have 256 possible values that we can use to mask out our scene. Other than that everything looks pretty normal.
We then create 4 render pipelines. One to render the mask to the stencil buffer, one to rendering the visible objects, one to render the hidden objects using a stencil stage, and one to render the texture we used as a mask to the screen. We'll skip the visible object pipeline as that's something that we've already covered in the rendering guide. Let's start with the mask pipeline.
I'm leveraging some code shared between multiple showcases, including a RenderPipelineBuilder to reduce the boilerplate. I won't go into all the code for that here, but you can check it out in the Github Repo
let mask_pipeline_layout =
    display
        .device
        .create_pipeline_layout(&wgpu::PipelineLayoutDescriptor {
            label: Some("mask_pipeline_layout"),
            bind_group_layouts: &[Some(&mask_bind_group_layout)],
            immediate_size: 0,
        });

let mask_shader = wgpu::include_wgsl!("mask.wgsl");
let mask_pipeline = framework::RenderPipelineBuilder::new()
    .vertex_shader(mask_shader.clone())
    .fragment_shader(mask_shader.clone())
    .fragment_entry_point("fs_mask")
    .cull_mode(Some(wgpu::Face::Back))
    .depth_stencil(wgpu::DepthStencilState {
        format: depth_stencil_format,
        depth_write_enabled: Some(false),
        depth_compare: Some(wgpu::CompareFunction::Always),
        stencil: wgpu::StencilState {
            write_mask: 0xFF,
            read_mask: 0xFF,
            front: wgpu::StencilFaceState {
                compare: wgpu::CompareFunction::Always,
                pass_op: wgpu::StencilOperation::Replace,
                ..Default::default()
            },
            back: wgpu::StencilFaceState::IGNORE,
        },
        bias: wgpu::DepthBiasState::default(),
    })
    .layout(&mask_pipeline_layout)
    .build(&display.device)?;
Here we specify that we:
- Want to use a shader called
mask.wgsl - Want to use backface culling
- Want to disable depth checking and writing
- Want a stencil stage that
- Reads and writes to all 8-bits of the texture
- Always replaces that value in the stencil buffer with reference value (we'll talk about that later) for front facing polygons
- Ignores back facing polygons
- Want to use the
mask_pipeline_layout
Let's take a look at mask.wgsl now:
struct VertexOutput {
    @builtin(position) clip_position: vec4<f32>,
    @location(0) uv: vec2<f32>,
};

@group(0)
@binding(0)
var mask_sampler: sampler;
@group(0)
@binding(1)
var mask_texture: texture_2d<f32>;

@vertex
fn vs_main(
    @builtin(vertex_index) in_vertex_index: u32,
) -> VertexOutput {
    var out: VertexOutput;
    // Create fullscreen triangle
    let x = f32((in_vertex_index << 1u) & 2u);
    let y = f32(in_vertex_index & 2u);
    out.clip_position = vec4<f32>(x * 2.0 - 1.0, y * 2.0 - 1.0, 0.0, 1.0);
    out.uv = vec2<f32>(x, 1.0 - y);
    return out;
}

@fragment
fn fs_mask(in: VertexOutput) {
    let sample = textureSample(mask_texture, mask_sampler, in.uv);
    // We invert this check so that the mask will render objects in
    // the center
    if (sample.a > 0.1) {
        discard;
    }
}

@fragment
fn fs_color(in: VertexOutput) -> @location(0) vec4<f32> {
    let sample = textureSample(mask_texture, mask_sampler, in.uv);
    return sample;
}
This shader is very simple. The vertex shader takes in the current vertex index and draws a triangle that's bigger than the screen to create a fullscreen image. The mask fragment shader samples a texture and discards any fragments that are beyond a certain threshold. The check is opposite what you would think it would be because we want to render objects where the mask is transparent, not the other way around. The color fragment shader just draws the texture to the screen.
When we go to render we first need to render the stencil mask.
{
    let mut draw_mask_stencil = encoder.begin_render_pass(&wgpu::RenderPassDescriptor {
        label: Some("draw_mask"),
        color_attachments: &[],
        depth_stencil_attachment: Some(wgpu::RenderPassDepthStencilAttachment {
            view: &self.depth_stencil_view,
            depth_ops: None,
            stencil_ops: Some(wgpu::Operations {
                load: wgpu::LoadOp::Clear(0),
                store: wgpu::StoreOp::Store,
            }),
        }),
        timestamp_writes: None,
                multiview_mask: None,
        occlusion_query_set: None,
    });

    draw_mask_stencil.set_stencil_reference(0xFF);
    draw_mask_stencil.set_pipeline(&self.mask_pipeline);
    draw_mask_stencil.set_bind_group(0, &self.mask_bind_group, &[]);
    draw_mask_stencil.draw(0..3, 0..1);
}
Most of this is standard rendering code, but two things of note here
- We tell wgpu to clear the stencil buffer
- The
set_stencil_reference()function tells wgpu what value we want to write to the stencil buffer when the stencil test passes.
Drawing the unseen
The next thing we will want to do is to draw our objects with the stencil buffer. First we need to setup the pipeline.
let hidden_pipeline = framework::RenderPipelineBuilder::new()
    .layout(&model_pipeline_layout)
    .vertex_shader(model_shader.clone())
    .fragment_shader(model_shader.clone())
    .cull_mode(Some(wgpu::Face::Back))
    .color_state(wgpu::ColorTargetState {
        format: display.config.format,
        blend: None,
        write_mask: wgpu::ColorWrites::ALL,
    })
    .depth_stencil(wgpu::DepthStencilState {
        format: depth_stencil.format(),
        depth_write_enabled: Some(true),
        depth_compare: Some(wgpu::CompareFunction::Less),
        stencil: wgpu::StencilState {
            // Read all bits
            read_mask: 0xFF,
            write_mask: 0xFF,
            front: wgpu::StencilFaceState {
                // Only draw when stencil reference == what's in the buffer
                compare: wgpu::CompareFunction::Equal,
                depth_fail_op: wgpu::StencilOperation::Keep,
                ..Default::default()
            },
            back: wgpu::StencilFaceState::IGNORE,
        },
        bias: wgpu::DepthBiasState::default(),
    })
    .vertex_buffer_desc(ModelVertex::desc())
    .vertex_buffer_desc(InstanceVertex::DESC)
    .build(&display.device)?;
We are skipping over model.wgsl as it's a standard shader that just renders the objects using normal mapping and diffuse lighting. The effect we want can use any shading method as long as the stencil buffer is used properly.
You can check out the code if you are curious.
We also create another pipeline just like this one to draw the visible objects. Will skip over that because it's just the same code but we use wgpu::StencilState::default() as we don't need to refer/update the stencil buffer.
With that in place we can now draw our hidden objects:
{
    let mut draw_hidden = encoder.begin_render_pass(&wgpu::RenderPassDescriptor {
        label: Some("draw_hidden"),
        color_attachments: &[Some(wgpu::RenderPassColorAttachment {
            view: &view,
            resolve_target: None,
            ops: wgpu::Operations {
                load: wgpu::LoadOp::Load,
                store: wgpu::StoreOp::Store,
            },
            depth_slice: None,
        })],
        depth_stencil_attachment: Some(wgpu::RenderPassDepthStencilAttachment {
            view: &self.depth_stencil_view,
            depth_ops: Some(wgpu::Operations {
                load: wgpu::LoadOp::Load,
                store: wgpu::StoreOp::Store,
            }),
            stencil_ops: Some(wgpu::Operations {
                load: wgpu::LoadOp::Load,
                store: wgpu::StoreOp::Store,
            }),
        }),
        occlusion_query_set: None,
        timestamp_writes: None,
                multiview_mask: None,
    });

    draw_hidden.set_stencil_reference(0xFF);
    draw_hidden.set_pipeline(&self.hidden_pipeline);
    draw_hidden.set_bind_group(0, &self.camera_bind_group, &[]);
    draw_hidden.set_vertex_buffer(1, self.instance_buffer.buffer.slice(..));
    for mesh in &self.model.meshes {
        if let Some(material) = self.model.materials.get(mesh.material) {
            draw_hidden.set_bind_group(1, &material.bind_group, &[]);
            draw_hidden
                .set_index_buffer(mesh.index_buffer.slice(..), wgpu::IndexFormat::Uint32);
            draw_hidden.set_vertex_buffer(0, mesh.vertex_buffer.slice(..));
            draw_hidden.draw_indexed(
                0..mesh.num_elements,
                0,
                instance_split..num_instances,
            );
        }
    }
}
I'm using a Model struct based on the model rendering tutorial with some custom drawing code as I have put the visible and hidden objects in the same instance buffer. Again the exact model rendering doesn't matter here as long as your pipeline is setup to use the stencil buffer correctly.
You can also use any model you want, but I'm using the rounded cube from the same demo.
The visible objects use similar code so I'll leave that out for brevity. You can check the example code if your stuck.
Completing the effect
The last thing to do is to draw the stencil texture over the screen to get finish the effect. The code is roughly the same as drawing the mask to the stencil buffer, but I'll list it here.
{
    let mut draw_mask_color = encoder.begin_render_pass(&wgpu::RenderPassDescriptor {
        label: Some("draw_mask_color"),
        color_attachments: &[Some(wgpu::RenderPassColorAttachment {
            view: &view,
            resolve_target: None,
            ops: wgpu::Operations {
                load: wgpu::LoadOp::Load,
                store: wgpu::StoreOp::Store,
            },
            depth_slice: None,
        })],
        depth_stencil_attachment: None,
        timestamp_writes: None,
                multiview_mask: None,
        occlusion_query_set: None,
    });

    draw_mask_color.set_pipeline(&self.mask_color_pipeline);
    draw_mask_color.set_bind_group(0, &self.mask_bind_group, &[]);
    draw_mask_color.draw(0..3, 0..1);
}
With all that you should get something like this:

Conclusion
This is only scratching the surface of what you can do with stencil buffers. Other effects you can create with stencil buffers are outlines around objects, x-ray vision, and more complex lighting techniques such as spot lights all use a stencil buffer.
I may cover some of these at a later date, but this should give you all the tools you need to try some of these yourself.
Demo
Thanks to these supporters!
- David Laban
- Bernard Llanos
- Ian Gowen
- Aron Granberg
- 折登 樹
- Julius Liu
- Lennart
- Jani Turkia
- Feng Liang
- Lions Heart
- Paul E Hansen
- Gunstein Vatnar
- Nico Arbogast
- Dude
- Youngsuk Kim
- Alexander Kabirov
- Danny McGee
- charlesk
- yutani
- Filip
- Eliot Bolduc
- Ben Anderson
- Thunk
- Craft Links
- Zeh Fernando
- Ken
- Ryan
- IC
- Felix
- Tema
- 大典 加藤
- Andrea Postal
- Davide Prati
- dadofboi
- ツナマヨ
If this helped you out and you want to support checkout my patreon or my kofi account!