The Depth Buffer
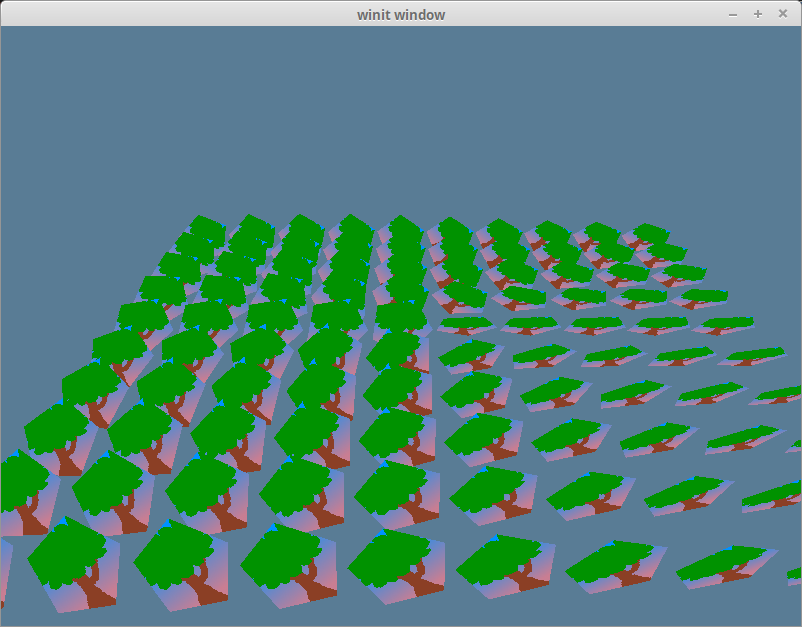
Let's take a closer look at the last example from an angle.

Models that should be in the back are getting rendered ahead of those in the front. This is caused by the draw order. By default, pixel data from a new object will replace old pixel data.
There are two ways to solve this: sort the data from back to front or use what's known as a depth buffer.
Sorting from back to front
This is the go-to method for 2D rendering as it's pretty easy to know what's supposed to go in front of what. You can just use the z-order. In 3d rendering, it gets a little trickier because the order of the objects changes based on the camera angle.
A simple way of doing this is to sort all the objects by their distance from the camera's position. There are flaws with this method, though, as when a large object is behind a small object, parts of the large object that should be in front of the small object will be rendered behind it. We'll also run into issues with objects that overlap themselves.
If we want to do this properly, we need to have pixel-level precision. That's where a depth buffer comes in.
A pixels depth
A depth buffer is a black and white texture that stores the z-coordinate of rendered pixels. Wgpu can use this when drawing new pixels to determine whether to replace or keep the data. This technique is called depth testing. This will fix our draw order problem without needing us to sort our objects!
Let's make a function to create the depth texture in texture.rs.
impl Texture {
    pub const DEPTH_FORMAT: wgpu::TextureFormat = wgpu::TextureFormat::Depth32Float; // 1.

    pub fn create_depth_texture(device: &wgpu::Device, config: &wgpu::SurfaceConfiguration, label: &str) -> Self {
        let size = wgpu::Extent3d { // 2.
            width: config.width.max(1),
            height: config.height.max(1),
            depth_or_array_layers: 1,
        };
        let desc = wgpu::TextureDescriptor {
            label: Some(label),
            size,
            mip_level_count: 1,
            sample_count: 1,
            dimension: wgpu::TextureDimension::D2,
            format: Self::DEPTH_FORMAT,
            usage: wgpu::TextureUsages::RENDER_ATTACHMENT // 3.
                | wgpu::TextureUsages::TEXTURE_BINDING,
            view_formats: &[],
        };
        let texture = device.create_texture(&desc);

        let view = texture.create_view(&wgpu::TextureViewDescriptor::default());
        let sampler = device.create_sampler(
            &wgpu::SamplerDescriptor { // 4.
                address_mode_u: wgpu::AddressMode::ClampToEdge,
                address_mode_v: wgpu::AddressMode::ClampToEdge,
                address_mode_w: wgpu::AddressMode::ClampToEdge,
                mag_filter: wgpu::FilterMode::Linear,
                min_filter: wgpu::FilterMode::Linear,
                mipmap_filter: wgpu::MipmapFilterMode::Nearest,
                compare: Some(wgpu::CompareFunction::LessEqual), // 5.
                lod_min_clamp: 0.0,
                lod_max_clamp: 100.0,
                ..Default::default()
            }
        );

        Self { texture, view, sampler }
    }
}
- We need the DEPTH_FORMAT for creating the depth stage of the
render_pipelineand for creating the depth texture itself. - Our depth texture needs to be the same size as our screen if we want things to render correctly. We can use our
configto ensure our depth texture is the same size as our surface textures. - Since we are rendering to this texture, we need to add the
RENDER_ATTACHMENTflag to it. - We technically don't need a sampler for a depth texture, but our
Texturestruct requires it, and we need one if we ever want to sample it. - If we do decide to render our depth texture, we need to use
CompareFunction::LessEqual. This is due to how thesampler_comparisonandtextureSampleCompare()interact with thetexture()function in GLSL.
We create our depth_texture in State::new().
let depth_texture = texture::Texture::create_depth_texture(&device, &config, "depth_texture");
We need to modify our render_pipeline to allow depth testing.
let render_pipeline = device.create_render_pipeline(&wgpu::RenderPipelineDescriptor {
    // ...
    depth_stencil: Some(wgpu::DepthStencilState {
        format: texture::Texture::DEPTH_FORMAT,
        depth_write_enabled: Some(true),
        depth_compare: Some(wgpu::CompareFunction::Less), // 1.
        stencil: wgpu::StencilState::default(), // 2.
        bias: wgpu::DepthBiasState::default(),
    }),
    // ...
});
- The
depth_comparefunction tells us when to discard a new pixel. UsingLESSmeans pixels will be drawn front to back. Here are the other possible values for a CompareFunction that you can use:
#[repr(C)]
#[derive(Copy, Clone, Debug, Hash, Eq, PartialEq)]
#[cfg_attr(feature = "serde", derive(Serialize, Deserialize))]
pub enum CompareFunction {
    Undefined = 0,
    Never = 1,
    Less = 2,
    Equal = 3,
    LessEqual = 4,
    Greater = 5,
    NotEqual = 6,
    GreaterEqual = 7,
    Always = 8,
}
- There's another type of buffer called a stencil buffer. It's common practice to store the stencil buffer and depth buffer in the same texture. These fields control values for stencil testing. We'll use default values since we aren't using a stencil buffer. We'll cover stencil buffers later.
Don't forget to store the depth_texture in State.
pub struct State {
    // ...
    depth_texture: Texture,
    // ...
}

async fn new(window: Window) -> Self {
    // ...

    Self {
        // ...
        depth_texture,
        // ...
    }
}
We need to remember to change the resize() method to create a new depth_texture and depth_texture_view.
fn resize(&mut self, width: u32, height: u32) {
    // ...

    self.depth_texture = texture::Texture::create_depth_texture(&self.device, &self.config, "depth_texture");

    // ...
}
Make sure you update the depth_texture after you update config. If you don't, your program will crash as the depth_texture will be a different size than the surface texture.
The last change we need to make is in the render() function. We've created the depth_texture, but we're not currently using it. We use it by attaching it to the depth_stencil_attachment of a render pass.
let mut render_pass = encoder.begin_render_pass(&wgpu::RenderPassDescriptor {
    // ...
    depth_stencil_attachment: Some(wgpu::RenderPassDepthStencilAttachment {
        view: &self.depth_texture.view,
        depth_ops: Some(wgpu::Operations {
            load: wgpu::LoadOp::Clear(1.0),
            store: wgpu::StoreOp::Store,
        }),
        stencil_ops: None,
    }),
});
And that's all we have to do! No shader code is needed! If you run the application, the depth issues will be fixed.
Demo
Challenge
Since the depth buffer is a texture, we can sample it in the shader. Create a bind group for the depth texture (or reuse an existing one), and render it to the screen.