The Pipeline
What's a pipeline?
If you're familiar with OpenGL, you may remember using shader programs. You can think of a pipeline as a more robust version of that. A pipeline describes all the actions the GPU will perform when acting on a set of data. In this section, we will be creating a RenderPipeline specifically.
Wait, shaders?
Shaders are mini-programs that you send to the GPU to perform operations on your data. There are three main types of shaders: vertex, fragment, and compute. There are others, such as geometry shaders or tesselation shaders, but they're not supported by WebGL. They should be avoided in general (see discussions). For now, we're just going to use vertex and fragment shaders.
Vertex, fragment... what are those?
A vertex is a point in 3D space (can also be 2D). These vertices are then bundled in groups of 2s to form lines and/or 3s to form triangles.
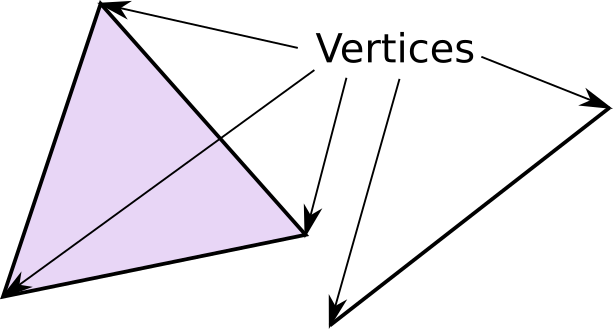
Most modern rendering uses triangles to make all shapes, from simple shapes (such as cubes) to complex ones (such as people). These triangles are stored as vertices, which are the points that make up the corners of the triangles.
We use a vertex shader to manipulate the vertices in order to transform the shape to look the way we want it.
The vertices are then converted into fragments. Every pixel in the result image gets at least one fragment. Each fragment has a color that will be copied to its corresponding pixel. The fragment shader decides what color the fragment will be.
WGSL
WebGPU Shading Language (WGSL) is the shader language for WebGPU. WGSL's development focuses on getting it to easily convert into the shader language corresponding to the backend; for example, SPIR-V for Vulkan, MSL for Metal, HLSL for DX12, and GLSL for OpenGL. The conversion is done internally, and we usually don't need to care about the details. In the case of wgpu, it's done by the library called naga.
Note that, at the time of writing this, some WebGPU implementations also support SPIR-V, but it's just a temporary measure during the transition period to WGSL and will be removed (If you are curious about the drama behind SPIR-V and WGSL, please refer to this blog post).
Writing the shaders
In the same folder as main.rs, create a file shader.wgsl. Write the following code in shader.wgsl.
// Vertex shader

struct VertexOutput {
    @builtin(position) clip_position: vec4<f32>,
};

@vertex
fn vs_main(
    @builtin(vertex_index) in_vertex_index: u32,
) -> VertexOutput {
    var out: VertexOutput;
    let x = f32(1 - i32(in_vertex_index)) * 0.5;
    let y = f32(i32(in_vertex_index & 1u) * 2 - 1) * 0.5;
    out.clip_position = vec4<f32>(x, y, 0.0, 1.0);
    return out;
}
First, we declare struct to store the output of our vertex shader. This currently consists of only one field, which is our vertex's clip_position. The @builtin(position) bit tells WGPU that this is the value we want to use as the vertex's clip coordinates. This is analogous to GLSL's gl_Position variable.
The next part of the shader code is the vs_main function. We are using @vertex to mark this function as a valid entry point for a vertex shader. We expect a u32 called in_vertex_index, which gets its value from @builtin(vertex_index).
We then declare a variable called out using our VertexOutput struct. We create two other variables for the x and y of a triangle.
Now we can save our clip_position to out. We then just return out, and we're done with the vertex shader!
Next up, the fragment shader. Still in shader.wgsl add the following:
// Fragment shader

@fragment
fn fs_main(in: VertexOutput) -> @location(0) vec4<f32> {
    return vec4<f32>(0.3, 0.2, 0.1, 1.0);
}
This sets the color of the current fragment to brown.
The @location(0) bit tells WGPU to store the vec4 value returned by this function in the first color target. We'll get into what this is later.
How do we use the shaders?
This is the part where we finally make the thing in the title: the pipeline. First, let's modify State to include the following.
// lib.rs
pub struct State {
    surface: wgpu::Surface<'static>,
    device: wgpu::Device,
    queue: wgpu::Queue,
    config: wgpu::SurfaceConfiguration,
    is_surface_configured: bool,
    window: Arc<Window>,
    // NEW!
    render_pipeline: wgpu::RenderPipeline,
}
Now, let's move to the new() method and start making the pipeline. We'll have to load in those shaders we made earlier, as the render_pipeline requires those.
let shader = device.create_shader_module(wgpu::ShaderModuleDescriptor {
    label: Some("Shader"),
    source: wgpu::ShaderSource::Wgsl(include_str!("shader.wgsl").into()),
});
One more thing, we need to create a PipelineLayout. We'll get more into this after we cover Buffers.
let render_pipeline_layout =
    device.create_pipeline_layout(&wgpu::PipelineLayoutDescriptor {
        label: Some("Render Pipeline Layout"),
        bind_group_layouts: &[],
        immediate_size: 0,
    });
Finally, we have all we need to create the render_pipeline.
let render_pipeline = device.create_render_pipeline(&wgpu::RenderPipelineDescriptor {
    label: Some("Render Pipeline"),
    layout: Some(&render_pipeline_layout),
    vertex: wgpu::VertexState {
        module: &shader,
        entry_point: Some("vs_main"), // 1.
        buffers: &[], // 2.
        compilation_options: wgpu::PipelineCompilationOptions::default(),
    },
    fragment: Some(wgpu::FragmentState { // 3.
        module: &shader,
        entry_point: Some("fs_main"),
        targets: &[Some(wgpu::ColorTargetState { // 4.
            format: config.format,
            blend: Some(wgpu::BlendState::REPLACE),
            write_mask: wgpu::ColorWrites::ALL,
        })],
        compilation_options: wgpu::PipelineCompilationOptions::default(),
    }),
    // continued ...
Several things to note here:
- Here you can specify which function inside the shader should be the
entry_point. These are the functions we marked with@vertexand@fragment - The
buffersfield tellswgpuwhat type of vertices we want to pass to the vertex shader. We're specifying the vertices in the vertex shader itself, so we'll leave this empty. We'll put something there in the next tutorial. - The
fragmentis technically optional, so you have to wrap it inSome(). We need it if we want to store color data to thesurface. - The
targetsfield tellswgpuwhat color outputs it should set up. Currently, we only need one for thesurface. We use thesurface's format so that copying to it is easy, and we specify that the blending should just replace old pixel data with new data. We also tellwgputo write to all colors: red, blue, green, and alpha. We'll talk more aboutcolor_statewhen we talk about textures.
    primitive: wgpu::PrimitiveState {
        topology: wgpu::PrimitiveTopology::TriangleList, // 1.
        strip_index_format: None,
        front_face: wgpu::FrontFace::Ccw, // 2.
        cull_mode: Some(wgpu::Face::Back),
        // Setting this to anything other than Fill requires Features::NON_FILL_POLYGON_MODE
        polygon_mode: wgpu::PolygonMode::Fill,
        // Requires Features::DEPTH_CLIP_CONTROL
        unclipped_depth: false,
        // Requires Features::CONSERVATIVE_RASTERIZATION
        conservative: false,
    },
    // continued ...
The primitive field describes how to interpret our vertices when converting them into triangles.
- Using
PrimitiveTopology::TriangleListmeans that every three vertices will correspond to one triangle. - The
front_faceandcull_modefields tellwgpuhow to determine whether a given triangle is facing forward or not.FrontFace::Ccwmeans that a triangle is facing forward if the vertices are arranged in a counter-clockwise direction. Triangles that are not considered facing forward are culled (not included in the render) as specified byCullMode::Back. We'll cover culling a bit more when we coverBuffers.
    depth_stencil: None, // 1.
    multisample: wgpu::MultisampleState {
        count: 1, // 2.
        mask: !0, // 3.
        alpha_to_coverage_enabled: false, // 4.
    },
    multiview_mask: None, // 5.
    cache: None, // 6.
});
The rest of the method is pretty simple:
- We're not using a depth/stencil buffer currently, so we leave
depth_stencilasNone. This will change later. countdetermines how many samples the pipeline will use. Multisampling is a complex topic, so we won't get into it here.maskspecifies which samples should be active. In this case, we are using all of them.alpha_to_coverage_enabledhas to do with anti-aliasing. We're not covering anti-aliasing here, so we'll leave this as false now.multiviewindicates how many array layers the render attachments can have. We won't be rendering to array textures, so we can set this toNone.cacheallows wgpu to cache shader compilation data. Only really useful for Android build targets.
Now, all we have to do is add the render_pipeline to State, and then we can use it!
// new()
Ok(Self {
    surface,
    device,
    queue,
    config,
    is_surface_configured: false,
    render_pipeline,
    window,
})
Using a pipeline
If you run your program now, it'll take a little longer to start, but it will still show the blue screen we got in the last section. That's because we created the render_pipeline, but we still need to modify the code in render() to actually use it.
// render()

// ...
{
    // 1.
    let mut render_pass = encoder.begin_render_pass(&wgpu::RenderPassDescriptor {
        label: Some("Render Pass"),
        color_attachments: &[
            // This is what @location(0) in the fragment shader targets
            Some(wgpu::RenderPassColorAttachment {
                view: &view,
                resolve_target: None,
                depth_slice: None,
                ops: wgpu::Operations {
                    load: wgpu::LoadOp::Clear(
                        wgpu::Color {
                            r: 0.1,
                            g: 0.2,
                            b: 0.3,
                            a: 1.0,
                        }
                    ),
                    store: wgpu::StoreOp::Store,
                }
            })
        ],
        depth_stencil_attachment: None,
        occlusion_query_set: None,
        timestamp_writes: None,
        multiview_mask: None,
    });

    // NEW!
    render_pass.set_pipeline(&self.render_pipeline); // 2.
    render_pass.draw(0..3, 0..1); // 3.
}
// ...
We didn't change much, but let's talk about what we did change.
- We renamed
_render_passtorender_passand made it mutable. - We set the pipeline on the
render_passusing the one we just created. - We tell
wgputo draw something with three vertices and one instance. This is where@builtin(vertex_index)comes from.
With all that you should be seeing a lovely brown triangle.
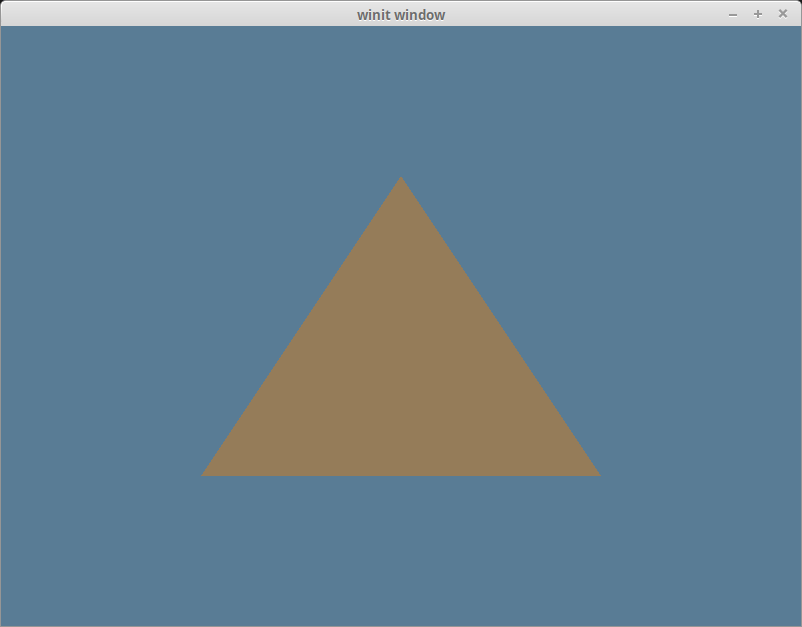
Demo
Challenge
Create a second pipeline that uses the triangle's position data to create a color that it then sends to the fragment shader. Have the app swap between these when you press the spacebar. Hint: you'll need to modify VertexOutput