Textures and bind groups
Up to this point, we have been drawing super simple shapes. While we can make a game with just triangles, trying to draw highly detailed objects would massively limit what devices could even run our game. However, we can get around this problem with textures.
Textures are images overlaid on a triangle mesh to make it seem more detailed. There are multiple types of textures, such as normal maps, bump maps, specular maps, and diffuse maps. We're going to talk about diffuse maps or, more simply, the color texture.
Loading an image from a file
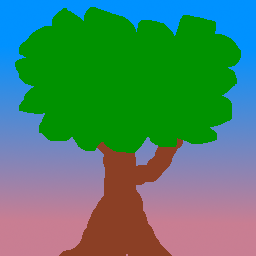
If we want to map an image to our mesh, we first need an image. Let's use this happy little tree:
We'll use the image crate to load our tree. Let's add it to our dependencies:
[dependencies.image]
version = "0.24"
default-features = false
features = ["png", "jpeg"]
The jpeg decoder that image includes uses rayon to speed up the decoding with threads. WASM doesn't support threads currently, so we need to disable this so our code won't crash when we try to load a jpeg on the web.
Decoding jpegs in WASM isn't very performant. If you want to speed up image loading in general in WASM, you could opt to use the browser's built-in decoders instead of image when building with wasm-bindgen. This will involve creating an <img> tag in Rust to get the image and then a <canvas> to get the pixel data, but I'll leave this as an exercise for the reader.
In State's new() method, add the following just after declaring the config:
let config = wgpu::SurfaceConfiguration {
    usage: wgpu::TextureUsages::RENDER_ATTACHMENT,
    format: surface_format,
    width: size.width,
    height: size.height,
    present_mode: surface_caps.present_modes[0],
    alpha_mode: surface_caps.alpha_modes[0],
    view_formats: vec![],
    desired_maximum_frame_latency: 2,
};
// NEW!

let diffuse_bytes = include_bytes!("happy-tree.png");
let diffuse_image = image::load_from_memory(diffuse_bytes).unwrap();
let diffuse_rgba = diffuse_image.to_rgba8();

use image::GenericImageView;
let dimensions = diffuse_image.dimensions();
Here, we grab the bytes from our image file and load them into an image, which is then converted into a Vec of RGBA bytes. We also save the image's dimensions for when we create the actual Texture.
Now, let's create the Texture:
let texture_size = wgpu::Extent3d {
    width: dimensions.0,
    height: dimensions.1,
    // All textures are stored as 3D, we represent our 2D texture
    // by setting depth to 1.
    depth_or_array_layers: 1,
};
let diffuse_texture = device.create_texture(
    &wgpu::TextureDescriptor {
        size: texture_size,
        mip_level_count: 1, // We'll talk about this a little later
        sample_count: 1,
        dimension: wgpu::TextureDimension::D2,
        // Most images are stored using sRGB, so we need to reflect that here.
        format: wgpu::TextureFormat::Rgba8UnormSrgb,
        // TEXTURE_BINDING tells wgpu that we want to use this texture in shaders
        // COPY_DST means that we want to copy data to this texture
        usage: wgpu::TextureUsages::TEXTURE_BINDING | wgpu::TextureUsages::COPY_DST,
        label: Some("diffuse_texture"),
        // This is the same as with the SurfaceConfig. It
        // specifies what texture formats can be used to
        // create TextureViews for this texture. The base
        // texture format (Rgba8UnormSrgb in this case) is
        // always supported. Note that using a different
        // texture format is not supported on the WebGL2
        // backend.
        view_formats: &[],
    }
);
Getting data into a Texture
The Texture struct has no methods to interact with the data directly. However, we can use a method on the queue we created earlier called write_texture to load in the texture. Let's take a look at how we do that:
queue.write_texture(
    // Tells wgpu where to copy the pixel data
    wgpu::TexelCopyTextureInfo {
        texture: &diffuse_texture,
        mip_level: 0,
        origin: wgpu::Origin3d::ZERO,
        aspect: wgpu::TextureAspect::All,
    },
    // The actual pixel data
    &diffuse_rgba,
    // The layout of the texture
    wgpu::TexelCopyBufferLayout {
        offset: 0,
        bytes_per_row: Some(4 * dimensions.0),
        rows_per_image: Some(dimensions.1),
    },
    texture_size,
);
The old way of writing data to a texture was to copy the pixel data to a buffer and then copy it to the texture. Using write_texture is a bit more efficient as it uses one buffer less - I'll leave it here, though, in case you need it.
let buffer = device.create_buffer_init(
    &wgpu::util::BufferInitDescriptor {
        label: Some("Temp Buffer"),
        contents: &diffuse_rgba,
        usage: wgpu::BufferUsages::COPY_SRC,
    }
);

let mut encoder = device.create_command_encoder(&wgpu::CommandEncoderDescriptor {
    label: Some("texture_buffer_copy_encoder"),
});

encoder.copy_buffer_to_texture(
    wgpu::TexelCopyBufferInfo {
        buffer: &buffer,
        offset: 0,
        bytes_per_row: 4 * dimensions.0,
        rows_per_image: dimensions.1,
    },
    wgpu::TexelCopyTextureInfo {
        texture: &diffuse_texture,
        mip_level: 0,
        array_layer: 0,
        origin: wgpu::Origin3d::ZERO,
    },
    is_surface_configured: false,
);

queue.submit(std::iter::once(encoder.finish()));
The bytes_per_row field needs some consideration. This value needs to be a multiple of 256. Check out the gif tutorial for more details.
TextureViews and Samplers
Now that our texture has data in it, we need a way to use it. This is where a TextureView and a Sampler come in. A TextureView offers us a view into our texture. A Sampler controls how the Texture is sampled. Sampling works similar to the eyedropper tool in GIMP/Photoshop. Our program supplies a coordinate on the texture (known as a texture coordinate), and the sampler then returns the corresponding color based on the texture and some internal parameters.
Let's define our diffuse_texture_view and diffuse_sampler now:
// We don't need to configure the texture view much, so let's
// let wgpu define it.
let diffuse_texture_view = diffuse_texture.create_view(&wgpu::TextureViewDescriptor::default());
let diffuse_sampler = device.create_sampler(&wgpu::SamplerDescriptor {
    address_mode_u: wgpu::AddressMode::ClampToEdge,
    address_mode_v: wgpu::AddressMode::ClampToEdge,
    address_mode_w: wgpu::AddressMode::ClampToEdge,
    mag_filter: wgpu::FilterMode::Linear,
    min_filter: wgpu::FilterMode::Nearest,
    mipmap_filter: wgpu::MipmapFilterMode::Nearest,
    ..Default::default()
});
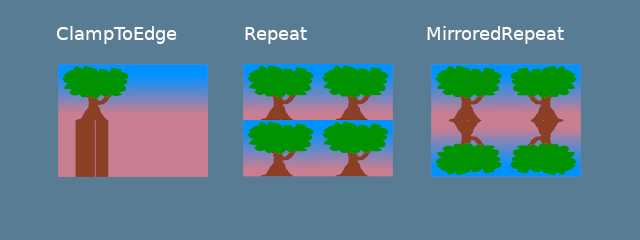
The address_mode_* parameters determine what to do if the sampler gets a texture coordinate that's outside the texture itself. We have a few options to choose from:
ClampToEdge: Any texture coordinates outside the texture will return the color of the nearest pixel on the edges of the texture.Repeat: The texture will repeat as texture coordinates exceed the texture's dimensions.MirrorRepeat: Similar toRepeat, but the image will flip when going over boundaries.
The mag_filter and min_filter fields describe what to do when the sample footprint is smaller or larger than one texel. These two fields usually work when the mapping in the scene is far from or close to the camera.
There are two options:
Linear: Select two texels in each dimension and return a linear interpolation between their values.Nearest: Return the texel value nearest to the texture coordinates. This creates an image that's crisper from far away but pixelated up close. This can be desirable, however, if your textures are designed to be pixelated, like in pixel art games or voxel games like Minecraft.
Mipmaps are a complex topic and will require their own section in the future. For now, we can say that mipmap_filter functions are similar to (mag/min)_filter as it tells the sampler how to blend between mipmaps.
I'm using some defaults for the other fields. If you want to see what they are, check the wgpu docs.
All these different resources are nice and all, but they don't do us much good if we can't plug them in anywhere. This is where BindGroups and PipelineLayouts come in.
The BindGroup
A BindGroup describes a set of resources and how they can be accessed by a shader. We create a BindGroup using a BindGroupLayout. Let's make one of those first.
let texture_bind_group_layout =
            device.create_bind_group_layout(&wgpu::BindGroupLayoutDescriptor {
                entries: &[
                    wgpu::BindGroupLayoutEntry {
                        binding: 0,
                        visibility: wgpu::ShaderStages::FRAGMENT,
                        ty: wgpu::BindingType::Texture {
                            multisampled: false,
                            view_dimension: wgpu::TextureViewDimension::D2,
                            sample_type: wgpu::TextureSampleType::Float { filterable: true },
                        },
                        count: None,
                    },
                    wgpu::BindGroupLayoutEntry {
                        binding: 1,
                        visibility: wgpu::ShaderStages::FRAGMENT,
                        // This should match the filterable field of the
                        // corresponding Texture entry above.
                        ty: wgpu::BindingType::Sampler(wgpu::SamplerBindingType::Filtering),
                        count: None,
                    },
                ],
                label: Some("texture_bind_group_layout"),
            });
Our texture_bind_group_layout has two entries: one for a sampled texture at binding 0 and one for a sampler at binding 1. Both of these bindings are visible only to the fragment shader as specified by FRAGMENT. The possible values for this field are any bitwise combination of NONE, VERTEX, FRAGMENT, or COMPUTE. Most of the time, we'll only use FRAGMENT for textures and samplers, but it's good to know what else is available.
With texture_bind_group_layout, we can now create our BindGroup:
let diffuse_bind_group = device.create_bind_group(
    &wgpu::BindGroupDescriptor {
        layout: &texture_bind_group_layout,
        entries: &[
            wgpu::BindGroupEntry {
                binding: 0,
                resource: wgpu::BindingResource::TextureView(&diffuse_texture_view),
            },
            wgpu::BindGroupEntry {
                binding: 1,
                resource: wgpu::BindingResource::Sampler(&diffuse_sampler),
            }
        ],
        label: Some("diffuse_bind_group"),
    }
);
Looking at this, you might get a bit of déjà vu! That's because a BindGroup is a more specific declaration of the BindGroupLayout. The reason they're separate is that it allows us to swap out BindGroups on the fly, so long as they all share the same BindGroupLayout. Each texture and sampler we create will need to be added to a BindGroup. For our purposes, we'll create a new bind group for each texture.
Now that we have our diffuse_bind_group, let's add it to our State struct:
pub struct State {
    surface: wgpu::Surface<'static>,
    device: wgpu::Device,
    queue: wgpu::Queue,
    config: wgpu::SurfaceConfiguration,
    is_surface_configured: bool,
    window: &'a wgpu::Window,
    render_pipeline: wgpu::RenderPipeline,
    vertex_buffer: wgpu::Buffer,
    index_buffer: wgpu::Buffer,
    num_indices: u32,
    diffuse_bind_group: wgpu::BindGroup, // NEW!
}
Make sure we return these fields in the new method:
impl State {
    async fn new() -> Self {
        // ...
        Self {
            surface,
            device,
            queue,
            config,
            is_surface_configured: false,
            window,
            render_pipeline,
            vertex_buffer,
            index_buffer,
            num_indices,
            // NEW!
            diffuse_bind_group,
        }
    }
}
Now that we've got our BindGroup, we can use it in our render() function.
// render()
// ...
render_pass.set_pipeline(&self.render_pipeline);
render_pass.set_bind_group(0, &self.diffuse_bind_group, &[]); // NEW!
render_pass.set_vertex_buffer(0, self.vertex_buffer.slice(..));
render_pass.set_index_buffer(self.index_buffer.slice(..), wgpu::IndexFormat::Uint16);

render_pass.draw_indexed(0..self.num_indices, 0, 0..1);
PipelineLayout
Remember the PipelineLayout we created back in the pipeline section? Now, we finally get to use it! The PipelineLayout contains a list of BindGroupLayouts that the pipeline can use. Modify render_pipeline_layout to use our texture_bind_group_layout.
async fn new(...) {
    // ...
    let render_pipeline_layout = device.create_pipeline_layout(
        &wgpu::PipelineLayoutDescriptor {
            label: Some("Render Pipeline Layout"),
            bind_group_layouts: &[Some(&texture_bind_group_layout)], // NEW!
            immediate_size: 0,
        }
    );
    // ...
}
A change to the VERTICES
There are a few things we need to change about our Vertex definition. Up to now, we've been using a color attribute to set the color of our mesh. Now that we're using a texture, we want to replace our color with tex_coords. These coordinates will then be passed to the Sampler to retrieve the appropriate color.
Since our tex_coords are two-dimensional, we'll change the field to take two floats instead of three.
First, we'll change the Vertex struct:
#[repr(C)]
#[derive(Copy, Clone, Debug, bytemuck::Pod, bytemuck::Zeroable)]
struct Vertex {
    position: [f32; 3],
    tex_coords: [f32; 2], // NEW!
}
And then reflect these changes in the VertexBufferLayout:
impl Vertex {
    fn desc() -> wgpu::VertexBufferLayout<'static> {
        use std::mem;
        wgpu::VertexBufferLayout {
            array_stride: mem::size_of::<Vertex>() as wgpu::BufferAddress,
            step_mode: wgpu::VertexStepMode::Vertex,
            attributes: &[
                wgpu::VertexAttribute {
                    offset: 0,
                    shader_location: 0,
                    format: wgpu::VertexFormat::Float32x3,
                },
                wgpu::VertexAttribute {
                    offset: mem::size_of::<[f32; 3]>() as wgpu::BufferAddress,
                    shader_location: 1,
                    format: wgpu::VertexFormat::Float32x2, // NEW!
                },
            ]
        }
    }
}
Lastly, we need to change VERTICES itself. Replace the existing definition with the following:
// Changed
const VERTICES: &[Vertex] = &[
    Vertex { position: [-0.0868241, 0.49240386, 0.0], tex_coords: [0.4131759, 0.99240386], }, // A
    Vertex { position: [-0.49513406, 0.06958647, 0.0], tex_coords: [0.0048659444, 0.56958647], }, // B
    Vertex { position: [-0.21918549, -0.44939706, 0.0], tex_coords: [0.28081453, 0.05060294], }, // C
    Vertex { position: [0.35966998, -0.3473291, 0.0], tex_coords: [0.85967, 0.1526709], }, // D
    Vertex { position: [0.44147372, 0.2347359, 0.0], tex_coords: [0.9414737, 0.7347359], }, // E
];
Shader time
With our new Vertex structure in place, it's time to update our shaders. We'll first need to pass our tex_coords into the vertex shader and then use them over to our fragment shader to get the final color from the Sampler. Let's start with the vertex shader:
// Vertex shader

struct VertexInput {
    @location(0) position: vec3<f32>,
    @location(1) tex_coords: vec2<f32>,
}

struct VertexOutput {
    @builtin(position) clip_position: vec4<f32>,
    @location(0) tex_coords: vec2<f32>,
}

@vertex
fn vs_main(
    model: VertexInput,
) -> VertexOutput {
    var out: VertexOutput;
    out.tex_coords = model.tex_coords;
    out.clip_position = vec4<f32>(model.position, 1.0);
    return out;
}
Now that we have our vertex shader outputting our tex_coords, we need to change the fragment shader to take them in. With these coordinates, we'll finally be able to use our sampler to get a color from our texture.
// Fragment shader

@group(0) @binding(0)
var t_diffuse: texture_2d<f32>;
@group(0) @binding(1)
var s_diffuse: sampler;

@fragment
fn fs_main(in: VertexOutput) -> @location(0) vec4<f32> {
    return textureSample(t_diffuse, s_diffuse, in.tex_coords);
}
The variables t_diffuse and s_diffuse are what's known as uniforms. We'll go over uniforms more in the cameras section. For now, all we need to know is that group() corresponds to the 1st parameter in set_bind_group() and binding() relates to the binding specified when we created the BindGroupLayout and BindGroup.
The results
If we run our program now, we should get the following result:
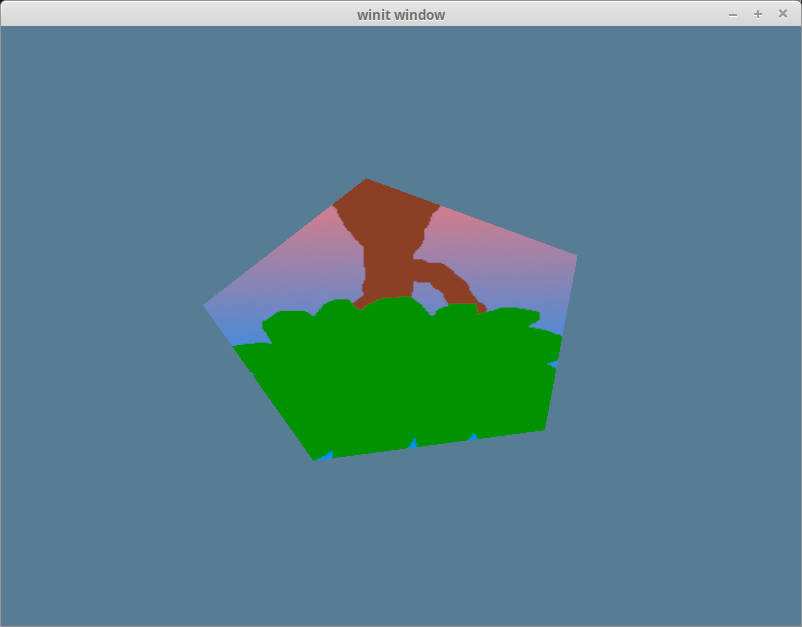
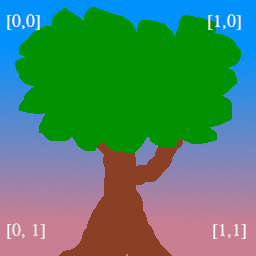
That's weird. Our tree is upside down! This is because wgpu's world coordinates have the y-axis pointing up, while texture coordinates have the y-axis pointing down. In other words, (0, 0) in texture coordinates corresponds to the top-left of the image, while (1, 1) is the bottom right.
We can get our triangle right-side up by replacing the y coordinate y of each texture coordinate with 1 - y:
const VERTICES: &[Vertex] = &[
    // Changed
    Vertex { position: [-0.0868241, 0.49240386, 0.0], tex_coords: [0.4131759, 0.00759614], }, // A
    Vertex { position: [-0.49513406, 0.06958647, 0.0], tex_coords: [0.0048659444, 0.43041354], }, // B
    Vertex { position: [-0.21918549, -0.44939706, 0.0], tex_coords: [0.28081453, 0.949397], }, // C
    Vertex { position: [0.35966998, -0.3473291, 0.0], tex_coords: [0.85967, 0.84732914], }, // D
    Vertex { position: [0.44147372, 0.2347359, 0.0], tex_coords: [0.9414737, 0.2652641], }, // E
];
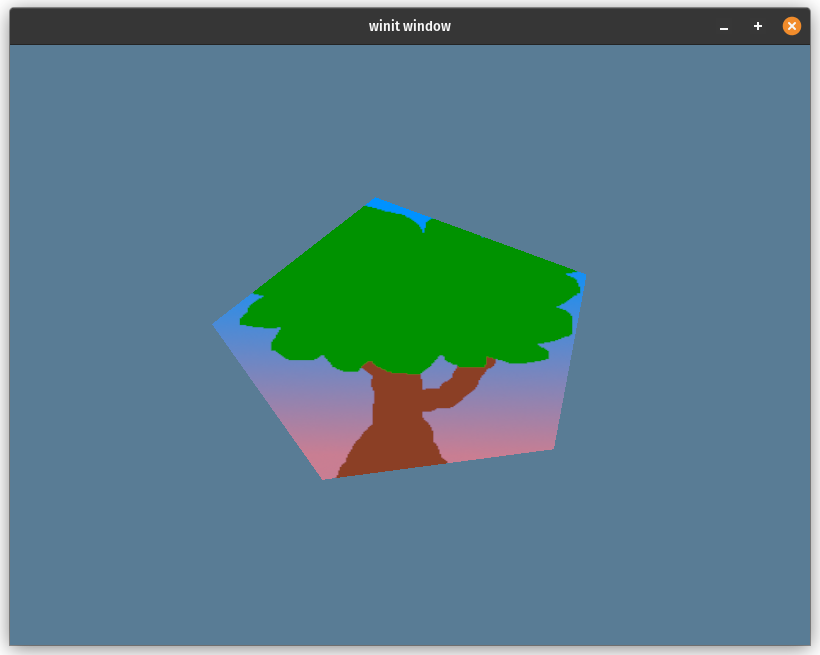
With that in place, we now have our tree right-side up on our pentagon:
Cleaning things up
For convenience, let's pull our texture code into its own module. We'll add the anyhow crate to our Cargo.toml file to simplify error handling. We'll also add the bytemuck crate to help pass mesh data to wgpu.
[dependencies]
image = "0.23"
cgmath = "0.18"
winit = { version = "0.30", features = ["android-native-activity"] }
env_logger = "0.10"
log = "0.4"
pollster = "0.3"
wgpu = "28.0"
bytemuck = { version = "1.24", features = [ "derive" ] } # NEW!
Then, in a new file called src/texture.rs, add the following:
use image::GenericImageView;
use anyhow::*;

pub struct Texture {
    #[allow(unused)]
    pub texture: wgpu::Texture,
    pub view: wgpu::TextureView,
    pub sampler: wgpu::Sampler,
}

impl Texture {
    pub fn from_bytes(
        device: &wgpu::Device,
        queue: &wgpu::Queue,
        bytes: &[u8],
        label: &str
    ) -> Result<Self> {
        let img = image::load_from_memory(bytes)?;
        Self::from_image(device, queue, &img, Some(label))
    }

    pub fn from_image(
        device: &wgpu::Device,
        queue: &wgpu::Queue,
        img: &image::DynamicImage,
        label: Option<&str>
    ) -> Result<Self> {
        let rgba = img.to_rgba8();
        let dimensions = img.dimensions();

        let size = wgpu::Extent3d {
            width: dimensions.0,
            height: dimensions.1,
            depth_or_array_layers: 1,
        };
        let texture = device.create_texture(
            &wgpu::TextureDescriptor {
                label,
                size,
                mip_level_count: 1,
                sample_count: 1,
                dimension: wgpu::TextureDimension::D2,
                format: wgpu::TextureFormat::Rgba8UnormSrgb,
                usage: wgpu::TextureUsages::TEXTURE_BINDING | wgpu::TextureUsages::COPY_DST,
                view_formats: &[],
            }
        );

        queue.write_texture(
            wgpu::TexelCopyTextureInfo {
                aspect: wgpu::TextureAspect::All,
                texture: &texture,
                mip_level: 0,
                origin: wgpu::Origin3d::ZERO,
            },
            &rgba,
            wgpu::TexelCopyBufferLayout {
                offset: 0,
                bytes_per_row: Some(4 * dimensions.0),
                rows_per_image: Some(dimensions.1),
            },
            size,
        );

        let view = texture.create_view(&wgpu::TextureViewDescriptor::default());
        let sampler = device.create_sampler(
            &wgpu::SamplerDescriptor {
                address_mode_u: wgpu::AddressMode::ClampToEdge,
                address_mode_v: wgpu::AddressMode::ClampToEdge,
                address_mode_w: wgpu::AddressMode::ClampToEdge,
                mag_filter: wgpu::FilterMode::Linear,
                min_filter: wgpu::FilterMode::Nearest,
                mipmap_filter: wgpu::MipmapFilterMode::Nearest,
                ..Default::default()
            }
        );

        Ok(Self { texture, view, sampler })
    }
}
Notice that we're using to_rgba8() instead of as_rgba8(). PNGs work fine with as_rgba8(), as they have an alpha channel. But JPEGs don't have an alpha channel, and the code would panic if we try to call as_rgba8() on the JPEG texture image we are going to use. Instead, we can use to_rgba8() to handle such an image, which will generate a new image buffer with an alpha channel even if the original image does not have one.
We need to import texture.rs as a module, so at the top of lib.rs add the following.
mod texture;
The texture creation code in new() now gets a lot simpler:
let config = wgpu::SurfaceConfiguration {
    usage: wgpu::TextureUsages::RENDER_ATTACHMENT,
    format: surface_format,
    width: size.width,
    height: size.height,
    present_mode: surface_caps.present_modes[0],
    alpha_mode: surface_caps.alpha_modes[0],
    view_formats: vec![],
    desired_maximum_frame_latency: 2,
};

let diffuse_bytes = include_bytes!("happy-tree.png"); // CHANGED!
let diffuse_texture = texture::Texture::from_bytes(&device, &queue, diffuse_bytes, "happy-tree.png").unwrap(); // CHANGED!

// Everything up until `let texture_bind_group_layout = ...` can now be removed.
We still need to store the bind group separately so that Texture doesn't need to know how the BindGroup is laid out. The creation of diffuse_bind_group slightly changes to use the view and sampler fields of diffuse_texture:
let diffuse_bind_group = device.create_bind_group(
    &wgpu::BindGroupDescriptor {
        layout: &texture_bind_group_layout,
        entries: &[
            wgpu::BindGroupEntry {
                binding: 0,
                resource: wgpu::BindingResource::TextureView(&diffuse_texture.view), // CHANGED!
            },
            wgpu::BindGroupEntry {
                binding: 1,
                resource: wgpu::BindingResource::Sampler(&diffuse_texture.sampler), // CHANGED!
            }
        ],
        label: Some("diffuse_bind_group"),
    }
);
Finally, let's update our State field to use our shiny new Texture struct, as we'll need it in future tutorials.
pub struct State {
    // ...
    diffuse_bind_group: wgpu::BindGroup,
    diffuse_texture: texture::Texture, // NEW
}
impl State {
    async fn new() -> Self {
        // ...
        Self {
            // ...
            num_indices,
            diffuse_bind_group,
            diffuse_texture, // NEW
        }
    }
}
Phew!
With these changes in place, the code should be working the same as before, but we now have a much easier way to create textures.
Demo
Challenge
Create another texture and swap it out when you press the space key.